What Is Image Classification? The Definitive 2025 Guide


Image classification is a powerful use case of machine learning. But what is it? How does it differ from other ML terms like computer vision or image recognition?
In this article we’ll answer these questions, alongside how it works, how you can easily create your own model, and what the top 10 image classification tools are.
Table of Contents
- What is image classification?
- Why would I use image classification?
- What are the types of classification?
- How do I launch my own image classifier?
- 10 best image classification solutions
What is image classification?
Image classification is the process of categorizing entire images into different groups (classes) based on their content. It involves machine learning algorithms — specifically deep learning models like Convolutional Neural Networks (CNNs) — that can identify patterns within images and assign them to their most applicable category.
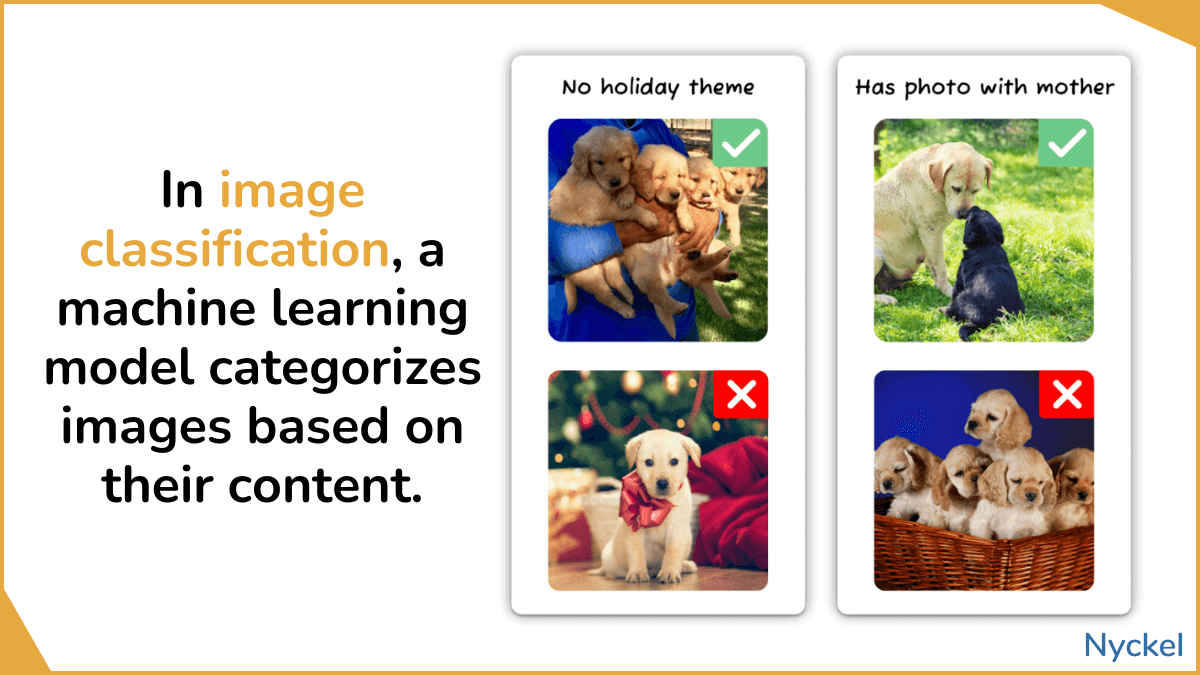
These models are generally built using annotated (aka, pre-labeled) training images. Once trained, you can feed the model new, unseen images and have it automatically categorize them. Alongside this label, the model will also provide a confidence level, ranging from 0 to 1, that highlights how confident the model is in its answer (the higher, the more confident).
Why would I use image classification?
Image classification allows you to automate what would otherwise be a manual labeling process. Machine learning models can also be more accurate than human tagging (though not always).
As an example, let’s say you sell hydroponic plant systems with built-in cameras, which take images throughout the day to identify plant health. You could manually tag images from these systems if you’ve sold, say, 50, but not at 5,000. Instead, you’ll want a machine learning model that can ingest these daily images and automatically tag them as healthy or not.
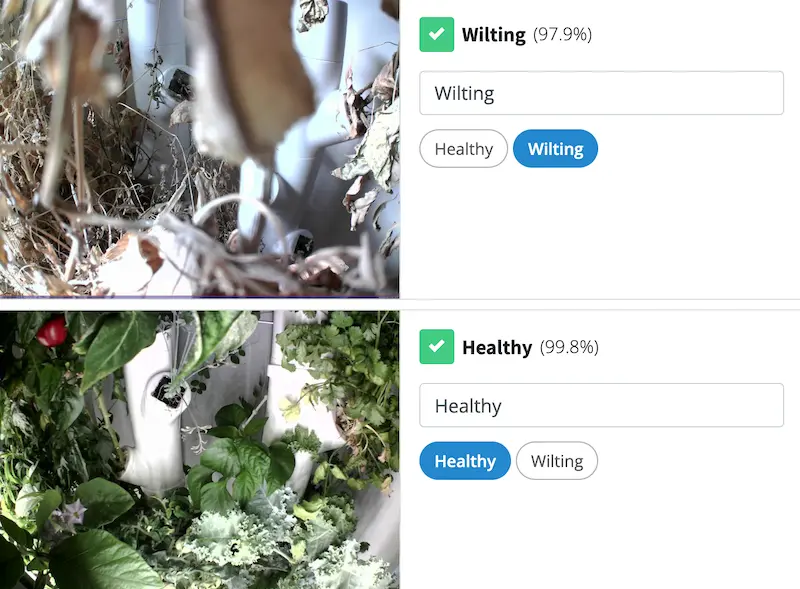
Image classification is used by many other industries too:
Content Moderation
Many brands, from social networks to dating apps to online communities, use image classification to auto-flag content that violates their rules. While NSFW flagging certainly comes to mind, many use cases are specific to the platform’s content, such as:
- Pet Media Group, one of the world’s largest online pet marketplaces, uses image classification to identify violations of their ethical breeding policies. To do this, they audit dog images for offending attributes like “has cropped ears” or “emojis covering ears”.
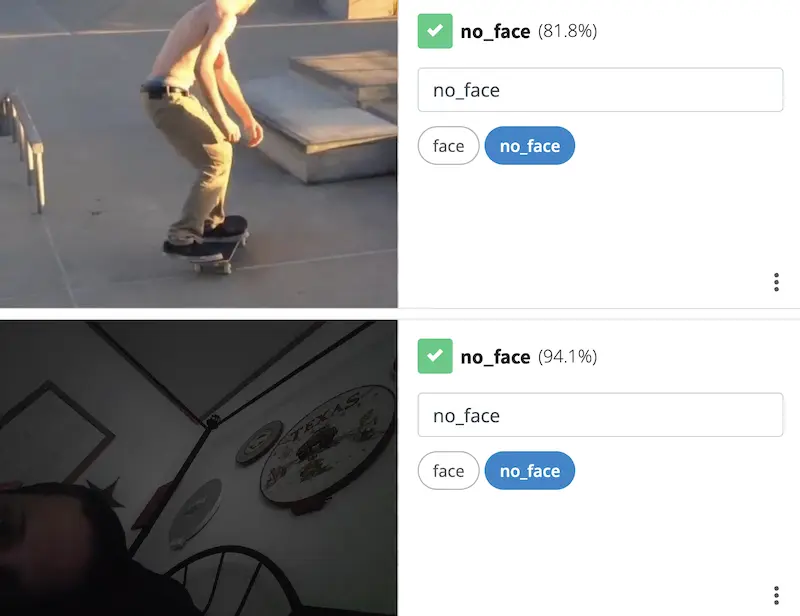
- Taimi, a dating app built on the concept of dating fluidity, uses image classification to determine whether a profile pic actually contains a face.
Augmented Reality
Augmented reality relies on the real-time identification of space and the objects within it, making it a great use case for classification.
Consider Spyscape, a spy museum in NYC, that has built an immersive, VR-enabled experience for visitors. Their AR game involves exploring various exhibits and interacting them through an app and RF wristbands. Their app uses image classification to identify what items people have interacted with throughout the museum.

Product Tagging
Retailers employ image classification to auto-tag images to enhance searchability. These models can identify everything from type of product, such as shoes or belt, to the colors in it. These tags are then added to the product SKU for searchability on their online store.
File Analysis
Image classification is widely used to auto-tag files and enhance searchability across various systems. These models can identify key visual elements, categorize content types, and extract relevant attributes from images. The resulting tags are then indexed for improved searchability and organization. This process is increasingly integrated with SaaS management platforms to streamline content organization and retrieval across multiple digital environments.
Species Identification
Species identification - whether that’s flower type, dog breed, or so on can be useful for researchers and businesses alike. Petco, for instance, could use pet identification to provide tailored experiences to customers based on their dog type.
Want to see such a classifier in action? Below is our flower species identifier. Just input a flower image, and it’ll tell you what it is.
How does classification differ from other machine learning terms?
The space is indeed full of similar, but slightly different, terms. Below defines other relevant concepts.
- Computer vision - Computer vision is a field of AI that enables computers to understand visual information across images and video. It includes tasks like image recognition, augmented reality, motion tracking, facial recognition, and more.
-
Image recognition - Image recognition is a subset of computer vision that involves identifying, classifying, and understanding elements within an image. This encomposses not just classification but also involves identifying individual objects or features within the image.
-
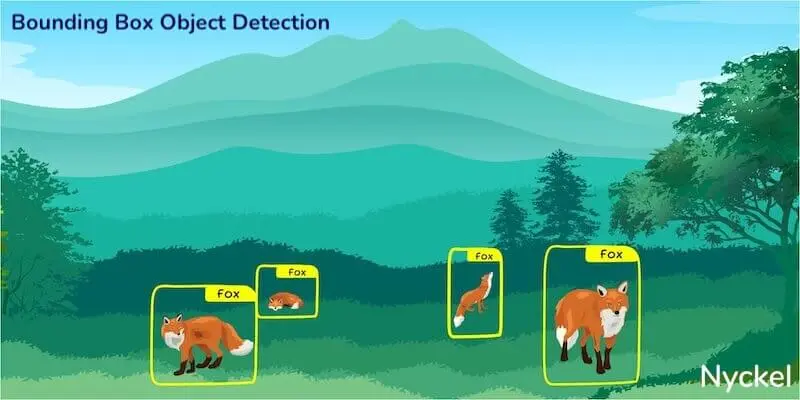
Object detection - Object detection identifies, locates, and classifies objects within an image. While classification categorizes an image as a whole, object detection will pinpoint what’s happening and where.
- Bounding box detection - In object detection, bounding boxes are rectangular frames drawn around the object you want identified.
-
Object segmentation - Object segmentation is a general process of dividing an image into segments to isolate and identify objects, but it doesn’t specify the method used to do this (but the below terms do).
-
Semantic segmentation - Semantic segmentation sorts each pixel of an image into predefined categories, treating multiple instances of the same object class (say, cats) as one entity without distinguishing between them.
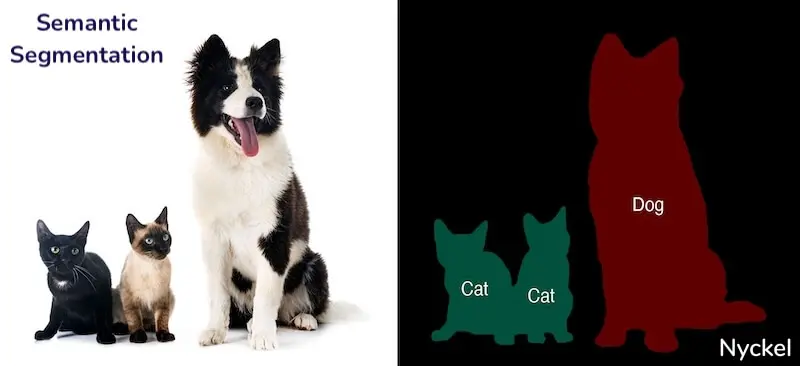
- Instance segmentation - Instance segmentation sorts each pixel of an image into predefined categories, but distinguishes unique instances of that object. For example, not only would it add a pixel-wide mask to all cats, it would also demarcate Cat 1 from Cat 2.

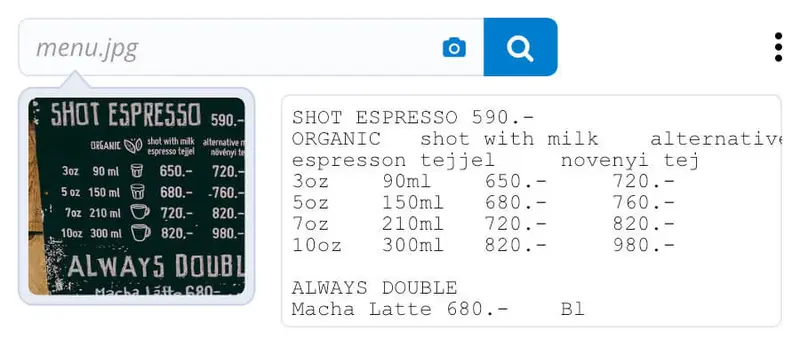
- OCR (Optical Character Recognition) - OCR extracts text and numbers from images. It’s used for tasks like converting scanned documents into machine-editable text.
Does classification differ from “image categorization” or “image sorting”?
Generally, these terms are used synonymously. “Classification” is a more technical machine learning term referring to the sorting, categorizing, labeling, and tagging of images.
How does image classification differ from text classification?
Text classification is like image classification but involves, not surprisingly, text instead of images. Rather than falling under computer vision, text classification falls under natural language processing (NLP), which is focused on teaching computers to understand human language.
Use cases of NLP include:
- Sentiment analysis - Identifies sentiment or emotion behind a text, such as positive, negative, or neutral.
- Topic identification - Detects what IAB category a text falls under, like “cooking content” or “news content.”
- Intent detection - Predicts what the user wants to do, such as “book a flight” or “complain to support.”
Is image classification what ChatGPT does?
Yes and no. AI can be broken into two main areas: generative and discriminative. Generative AI refers to AI that creates (generates) new content. Discriminative AI refers to AI that identifies (discriminates between) elements within data. Image classification falls into the latter, while ChatGPT’s main use case is generative.

So, when someone uses ChatGPT, they are likely using it for generative purposes, like asking it to write poems about their pets.

That said, with ChatGPT, you can now upload an image and have it classified. The problem is you have no control over the training set, so it’ll work well for “elephant or no elephant,” but less so for business use cases involving proprietary data.

Do I need machine learning experience to build a classification model?
No! Even just a few years ago, building such ML models was exclusive to ML experts. But recently there’s been an influx of AutoML (automated machine learning) platforms, which abstract the ML complexity and do preprocessing, training, and deployment for you. We dive into these tools later in the article.
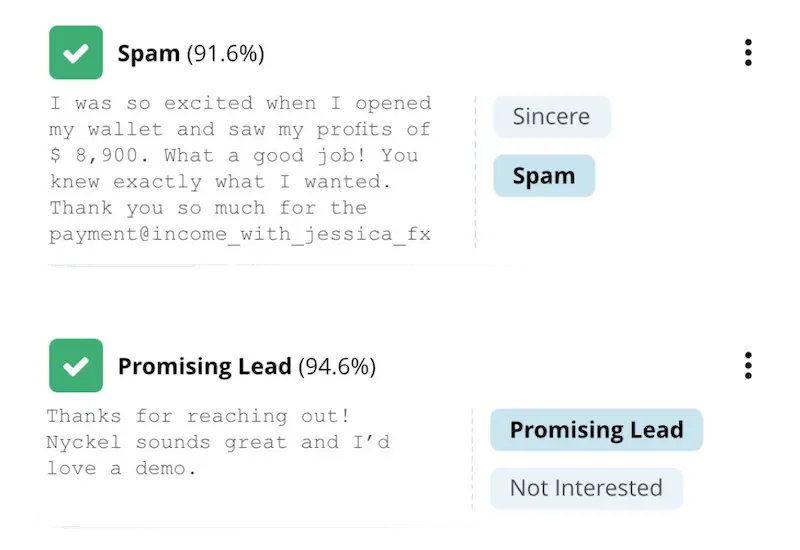
What is a classification confidence score?
When classifying an image, these models are making a guess based on their training data. The confidence score highlights how confident the model is about the accuracy of that label.
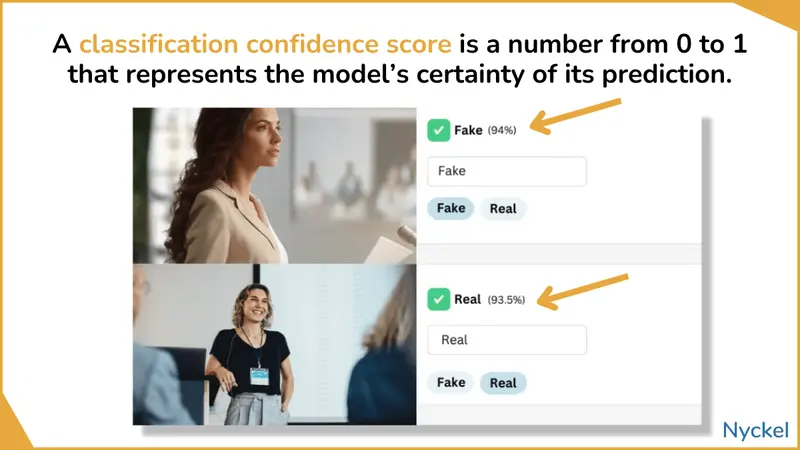
These scores range from 0 to 1, often represented as a percentage (0% to 100%), with a higher score meaning the model is more confident that the label is right.
These scores are probabilistic and don’t mean the model is right or wrong, though. A 99% chance still leaves the possibility that the AI is wrong. Confidence is also not necessarily a measure of accuracy. If the model is poorly trained, it might be highly confident in a wrong answer.
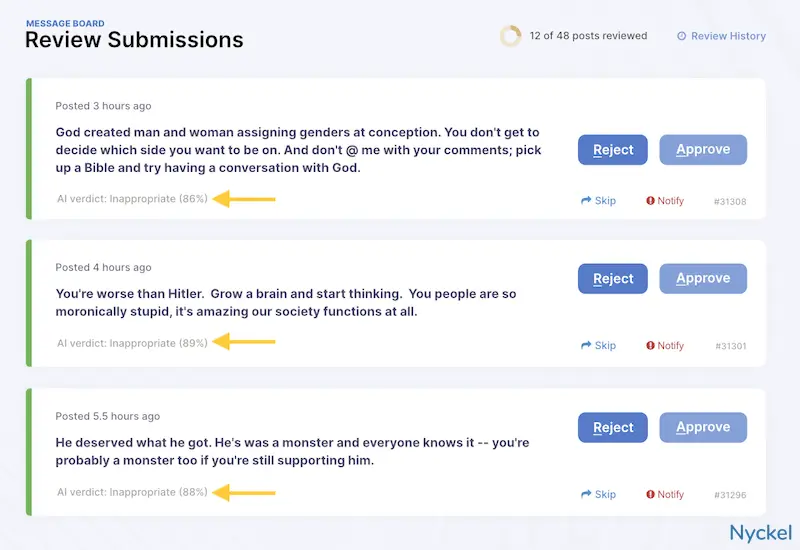
Nonetheless, if your overall accuracy is good, the confidence level can be a useful tool when integrating the model into your workflow.
A social network, for instance, could employ a hybrid moderation approach, where they use a model to take a first pass at moderating user-generated content. Anything that has, say, a 98%+ confidence will automatically get approved or denied, and everything else will go to manual review. If most content falls into this 98%+ bucket, then they are still saving themselves much time and effort.
Are there ethical considerations with classification?
As with any AI, classification runs the risk of biases and misuse.
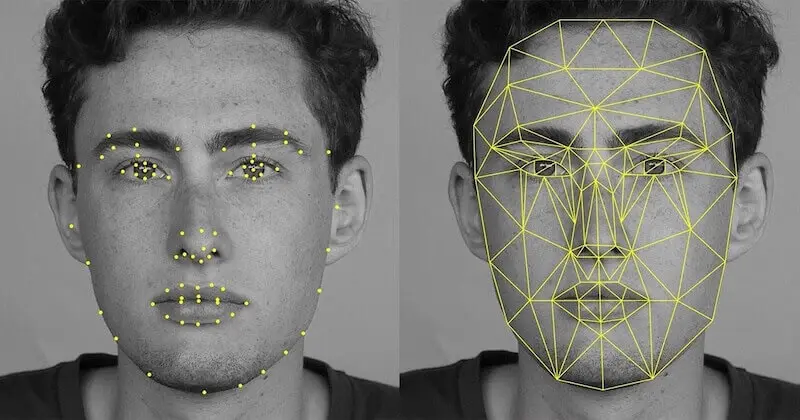
This is especially true with sensitive information like human faces. In 2017, for instance, Standard created a face classifier that correctly identified sexual orientation 91% of the time for men (human judges had just a 61% accuracy). You could imagine a model like that being used on people without their consent, potentially for nefarious purposes.
Of course, if you’re building a classifier to categorize, say, blurry images, there’s little to worry about. Still, when building any type of AI, you should be cognizant of potential misuse risks.
What are the types of classification?
There are many ways to break down classification, each referring to something slightly different. Let’s tackle three of them:
- Binary, multi-class, and multi-label - Denotes (1) how many labels you have, and (2) how many labels an image can be tagged with.
- Hierarchical vs. flat - Refers to different methods of structuring your classification algorithm.
- Supervised vs. unsupervised - Describes two approaches you can take around data labeling and category selection.
What is binary, multi-class, and multi-label classification?
These terms highlight (1) the # of classes the model can choose from and (2) whether an image can have more than one tagged class (exclusive versus non-exclusive).
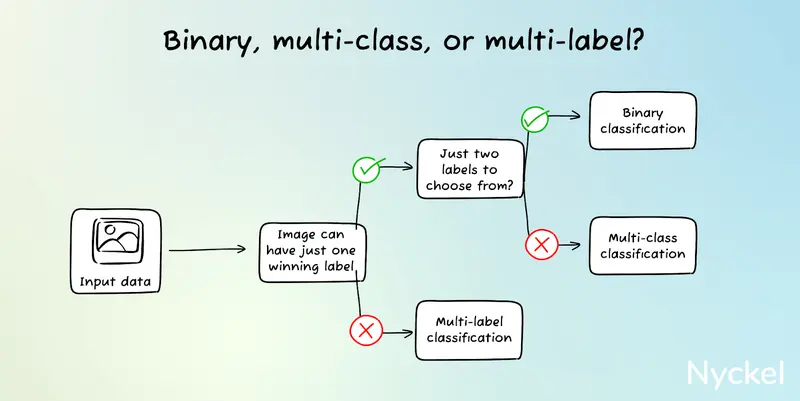
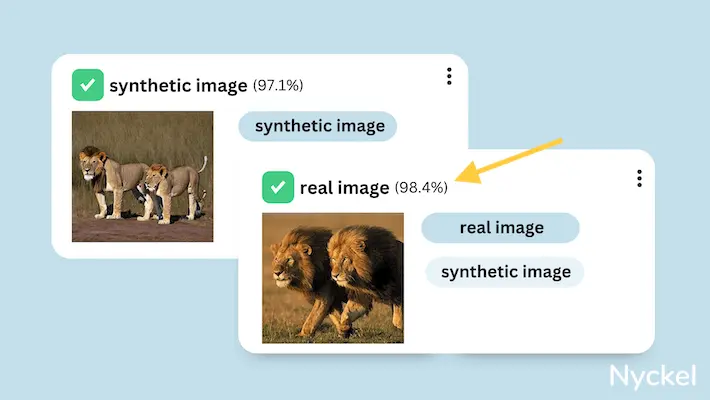
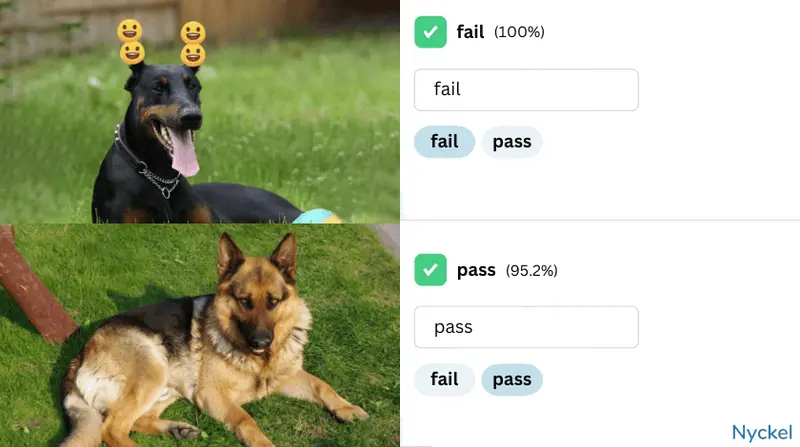
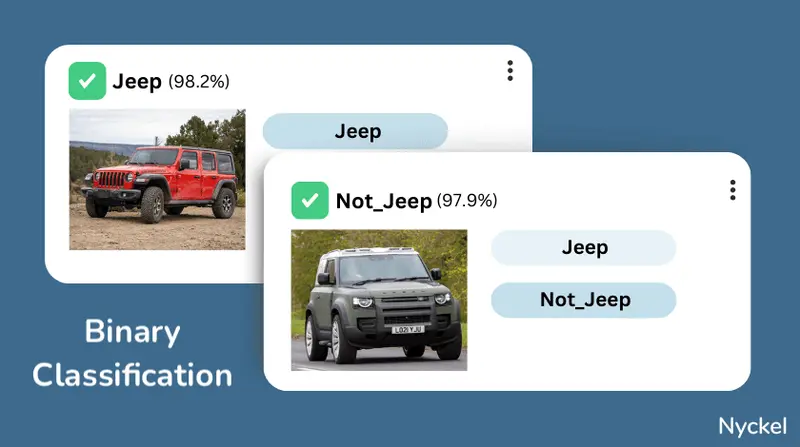
- Binary classification - Binary classification involves picking one winner out of two classes, such as pass/fail or true/false. It can be as simple as “snowing or sunny” to something more complex like “shingles or not.”
- Multi-class classification - Multi-class classification also involves just one winner, but instead of two possible classes, there are three or more possible labels.
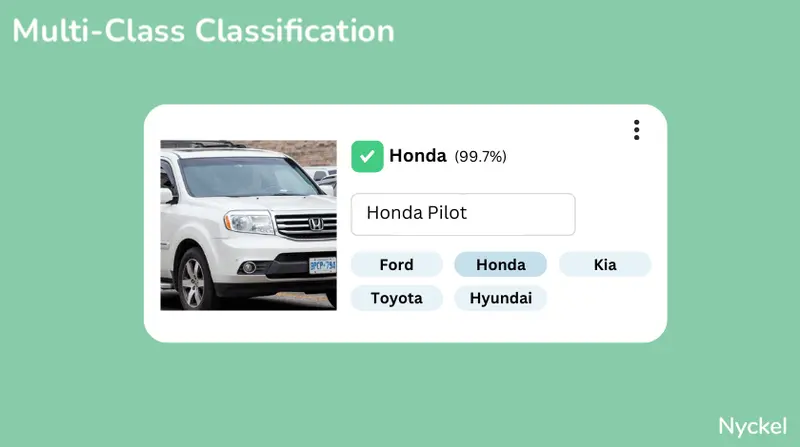
Such examples include a bird identifier with 291 labels or a dog breed classifier with 120.
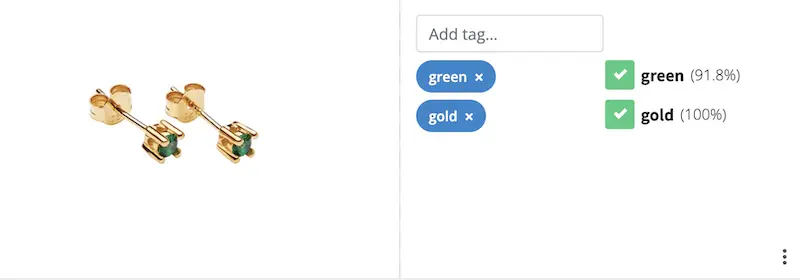
- Multi-label classification - With binary and multi-class, the class is exclusive, meaning there can be only one attached label. With multi-label classification there can be more than one. In other words, the model can tag the image with two or more labels.
For instance, classifying flower species is multi-class, as each flower can be only one species. But identifying the various colors in the flower is multi-label, since a flower can contain multiple colors.
| Binary | Multi-Class | Multi-Label | |
|---|---|---|---|
| Use when | The image can fall under just 1 of 2 predefined categories | The image can fall under just 1 of 3+ predefined categories | The image can have multiple non-exclusive tags. |
| Use cases | Identifying if an image is AI or not | Identifying flower species | Tagging what clothing items (pants, shirts, jacket, etc.) are in each product image |
What is hierarchical vs. flat classification?
Hierarchical vs. flat classification refers to how one can structure the classification algorithm. With hierarchical, you use multi-level category branches, while flat treats all categories independently.
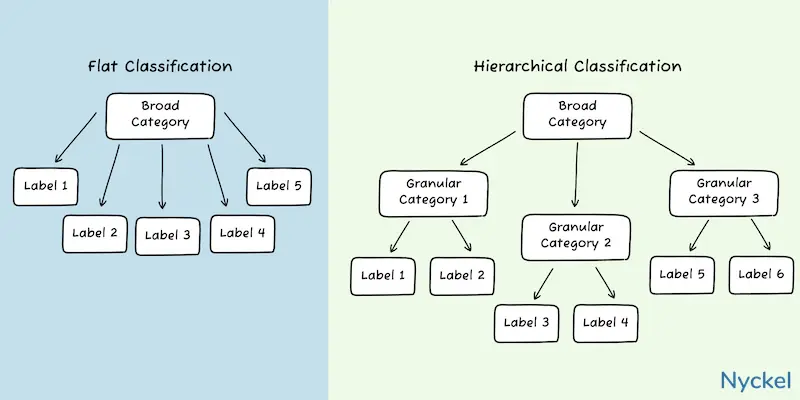
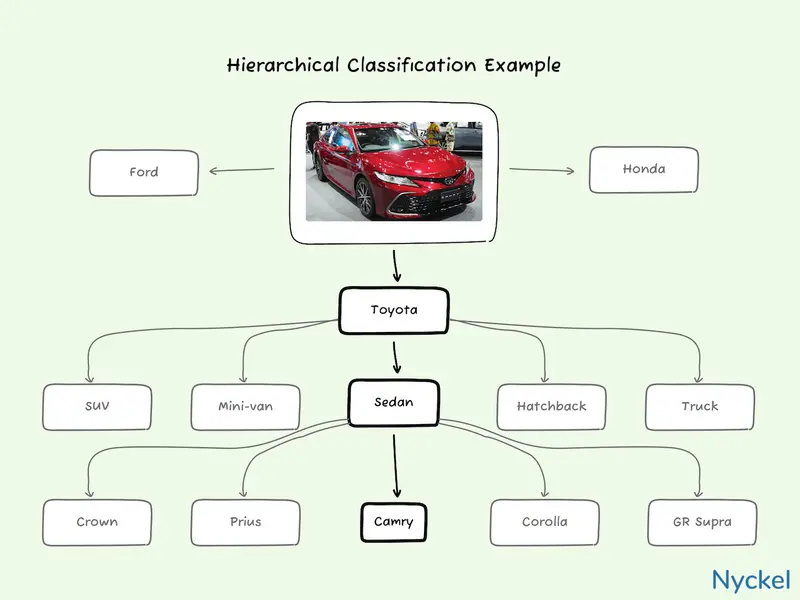
A car model classifier, for instance, is a great candidate for hierarchical classification. Here, you could have two levels. The top level is composed of one model that identifies the car’s make (Toyota, Honda, etc.). Then, under each company is a new classifier that contains only that make’s vehicles. The model will run any image through the top-level first, then re-run it against the next level, based on the branch it picked.
With flat classification the algorithm would instead look at all car models independently and then pick one.
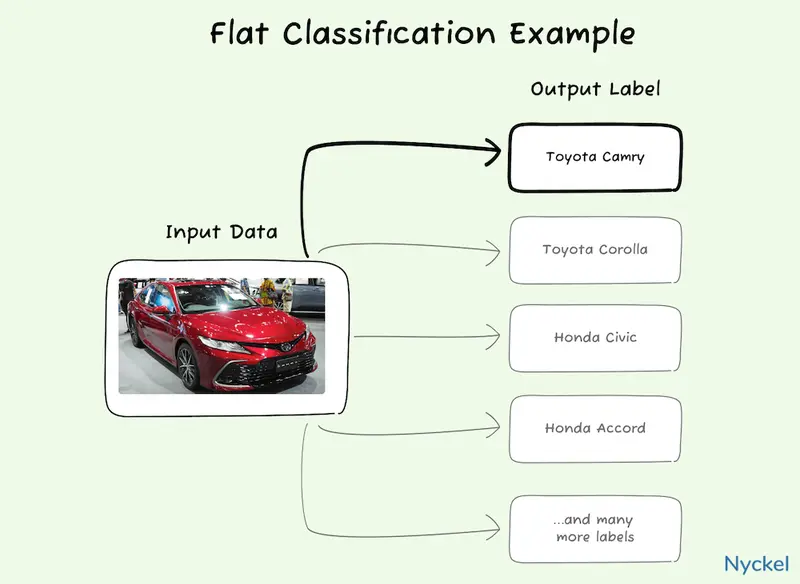
To better illustrate this, let’s say there are 130 car brands, 7500 different models, and 15 Toyota models. Your goal is to build a model that will identify a Toyota Prius.
-
With flat classification, the algorithm would have 7500 different classes. It would ingest the car image and look across all those labels to determine a winner.
-
With hierarchical classification, the algorithm would first look for the brand across 130 classes. If it correctly identifies it as Toyota, it would then rerun it across just the 15 Toyota models.
Here are some considerations around which algorithm to use:
| Hierarchical | Flat | |
|---|---|---|
| Use when | You have a high number of classes that can also be structured into logical hierarchies. | You don’t have many classes and/or classes can’t be organized into logical branches. |
| Pros | It can be easier to troubleshoot, as you can identify at which level there are accuracy issues. If the hierarchies are well-defined, it will also likely be more accurate. |
It’s simpler to set up, and for models without many classes, requires less computational work. It also involves less pre-labeling of training images (one level vs multiple). |
| Cons | More work to set-up and requires multi-level labeling of each training image. | With many classes, identifying the holes in the model can be difficult. |
| Use cases | Car makes and models. | A Recycle or Not identifier, as there’s no hierarchical structure. A Logo Detector as well. |
What is supervised vs. unsupervised classification?
Supervised vs. unsupervised classification describes two approaches you can take around data labeling and category selection. Specifically, supervised models involve defining your own labels, while the model does it for you in unsupervised.
-
Supervised classification involves training a model on a pre-labeled dataset using a predefined list of classes. Meaning, you are picking the labels and telling the system what images fall under each. This classification method is the one this article assumes you’re using.
-
Unsupervised classification, on the other hand, involves uploading unlabeled training images and having the model come up with its own categories. It’s useful if you have a large dataset and want to discover hidden patterns. A social network, for instance, could use this to organize millions of photos without having to first tag them.
The downside is that since the categories are not predefined, they are often not as precise or meaningful as supervised classification. In the above example, if the model clustered the photos by, say, dominant color, that may not be particularly interesting to the network.
Considerations for each include:
| Supervised | Unsupervised | |
|---|---|---|
| Use when | You care about specific classes. | You want images grouped but don’t have specific categories in mind. |
| Pros | You get to define the labels. | It doesn’t require time-intensive labeling. Can also unearth hidden patterns. |
| Cons | Labeling each image can take time, and a highly accurate model can require a large dataset. | You must use whatever categories the model chooses. Hard to measure accuracy. |
| Use cases | A gemstone classifier with set # of stones. | Photo album sorting. |
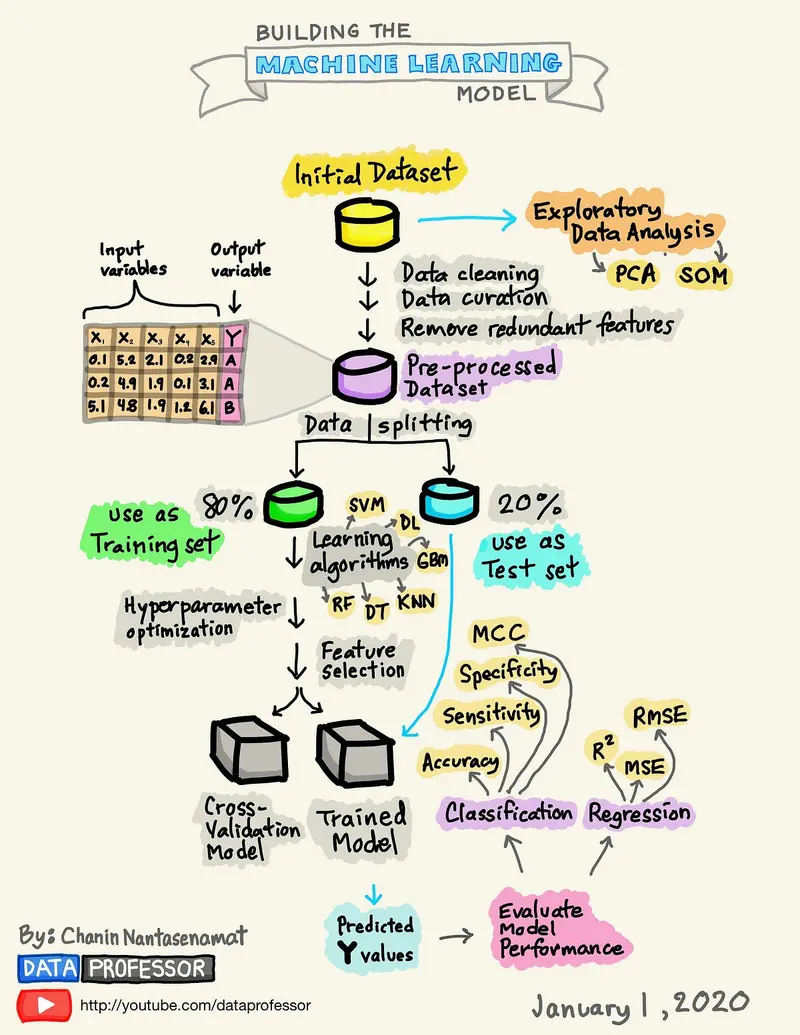
At a high level, how does building a classifier work?
The process includes:
- Gathering and pre-processing training images - To train a model, you need pre-labeled training samples. You’ll also want to partition your images into three buckets: training, validation, and test.
- Picking a tool to build your model - Your main options are building entirely from scratch, using a machine learning framework like Tensorflow, or integrating with an AutoML classification tool. We touch upon these methods later.
- Training the model - You’ll upload the training images, wait for it to train, and then test it. Additional fine-tuning will likely be needed to hit an ideal accuracy.
- Integrating the model into your workflow - Once training is done, you’ll need a way to deploy the working model into your application or workflow. Most AutoML vendors provide this via APIs or no-code solutions like Zapier.
How do I find training samples?
A model is only as good as its training data. It’s important, therefore, to have a robust set of labeled images to train with. This is easier said than done, but below are some paths you can take:
- Use internal images - If you’re building a classifier with proprietary internal data, your images will likely come from your own database. To tag these, you can:
-Use current metadata - Businesses often have metadata already tied to database images. If you do, you can parse this data into separate classes.
-Do it manually in-house - If you have untagged images, you could manually label them yourself.
-Outsource tagging - You could also outsource this manual annotation to a third-party.
-Use assisted learning tools - These solutions assist in labeling by suggesting potential classes based on image analysis. Your team can then review, refine, and confirm these labels.
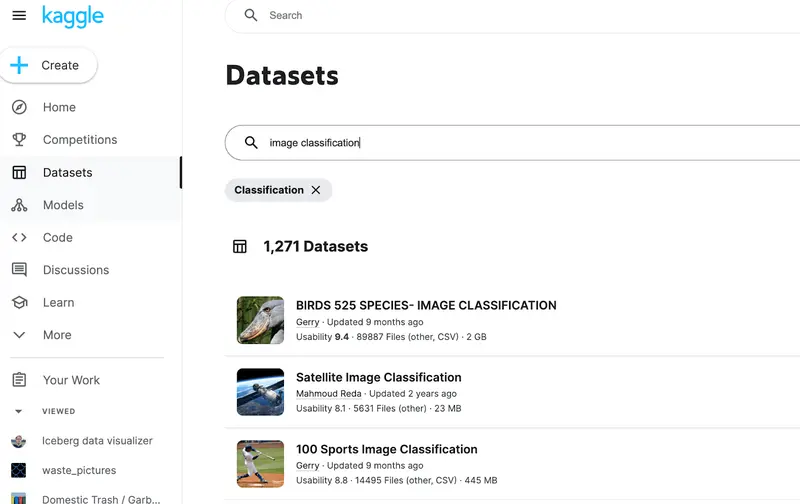
- Use existing datasets - There are many free downloadable image datasets on sites like Kaggle, Roboflow, and Papers with Code. These are good options if you’re looking for generic data (like datasets for Job Titles or Pokemon cards). More robust datasets can be purchased from various data suppliers.
How many training samples do I need?
There is no set rule for how much training data you need for an accurate model. It could range from four to four million plus. But below are things to keep in mind:
- Number of labels - The more labels you have, the more images you’ll need. For a classifier that identifies logos across 50,000 brands, you’re looking at 250k-500k samples at minimum (assuming 5-10 per brand).
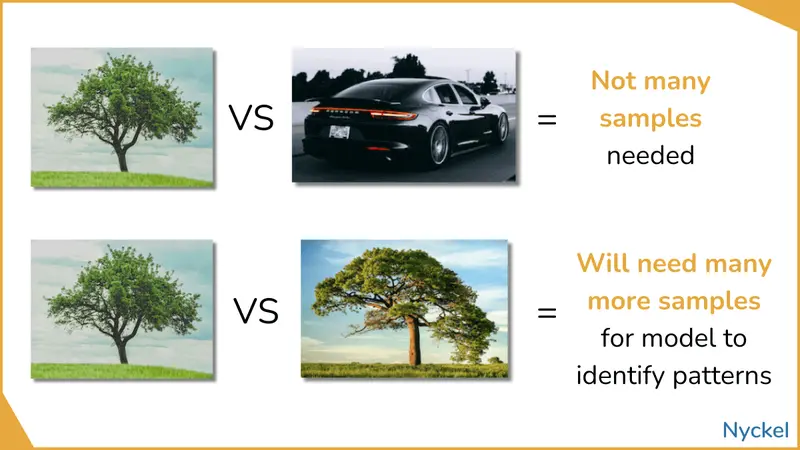
- Visual discreteness of labels - If the classes are visually quite distinct, you’ll need fewer samples to train the model compared to classes that look alike. For example, distinguishing between a tree and a car is easier than differentiating between tree species. With the latter, the model will need many more images to reach high accuracy.
- The tool you’re using - Some architectures are more data-efficient than others. Nyckel, for instance, lets you build a classifier with as few as two images per label.
- Your target accuracy - As a rule of thumb, adding more training images will improve the model. So, to hit 95% accuracy, you’ll need more samples than a 60% target.
That said, in Nyckel’s recent training data analysis, building a classifier with 80% accuracy took as few as 13 samples per class. Most of the classifiers then leveled off at 90% even with 100s of additional samples - indicating there’s quick diminishing returns as early as 10-15 samples per class.

This held true across industries and inputs (images and text), although more samples were generally needed for fine-grained classification.
How do I prepare my images for training?
There are a few strategies to ensure your images are ready to upload:
-
Mirror your end use case - Use images that are similar to your actual use case. If you’re building a puppy identifier, for instance, training it with adult dog images could be problematic. This is by far the most important rule in preparing your images.
-
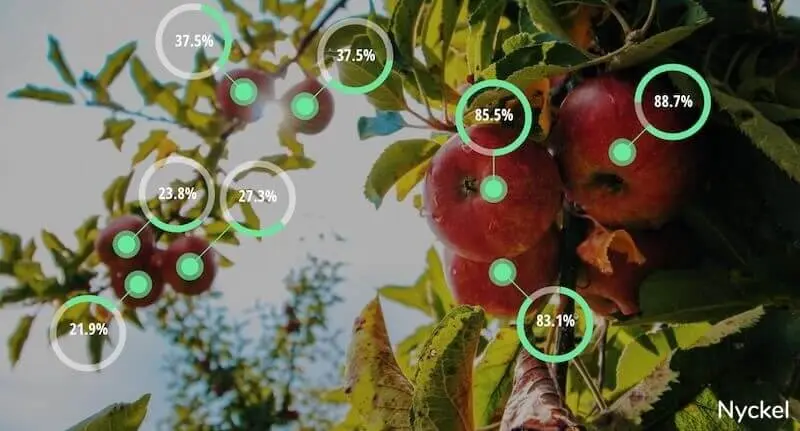
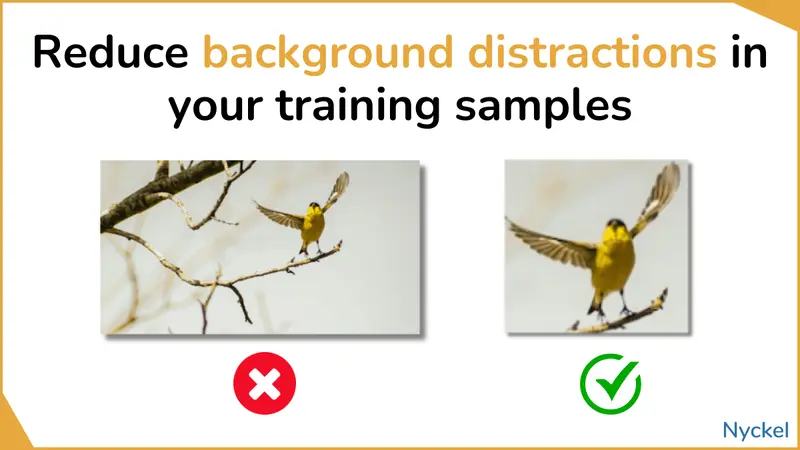
Reduce background distraction - The image should focus on what differentiates that label. If you’re building a bird identifier and the training images all consist of a small bird on a large tree, the model will struggle. So, you’d want to crop the image to just the bird, not the tree too.
- Resize images - Some tools/models require specific image dimensions (usually 224x224px). You’ll want to crop and resize images to fit the dimensions you need, particularly if the original image files are huge. If you do this for training images, it’s important you do it for test images too.
- Normalize Images - Scale pixel values to a standard range, likely between 0 and 1, or -1 and 1. Here’s a quick guide on pixel normalization. If you do this for training images, it’s important you do it for test images too.
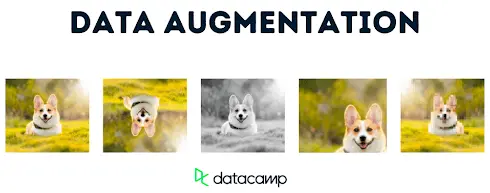
- Do data augmentation - This involves taking the original image and creating more training samples via various small transformations (like rotating it, small color changes, etc.). That said, if your classification relies on colors, or the position of the image matters, then this step could confuse the system too.
- Remove corrupted images - Check for any corrupted or unreadable files.
- Balance the # of images in each class - Each class should have roughly the same number of images. Otherwise, the model may be biased toward the larger one.
- Audit your data - Finally, audit your images to ensure the labels are accurate and that nothing is missing or irrelevant.
If you use an AutoML vendor, work with them to understand what you need to do. Many, for instance, will normalize and resize images for you.
What’s the difference between training, validation, and test images?
Before training the model, it’s best practice to segment your images into three buckets: training, validation, and test.
- Training images - Annotated images used to train the model.
- Validation images - Annotated images used to test and fine-tune the model during training. They help in identifying holes in the algorithm, so you can figure out how to improve it. While they influence the training process, they are never used for training.
- Test images - Annotated images used only after the model is done. They provide an unbiased evaluation of the model’s performance, as they are never used for training or fine-tuning.
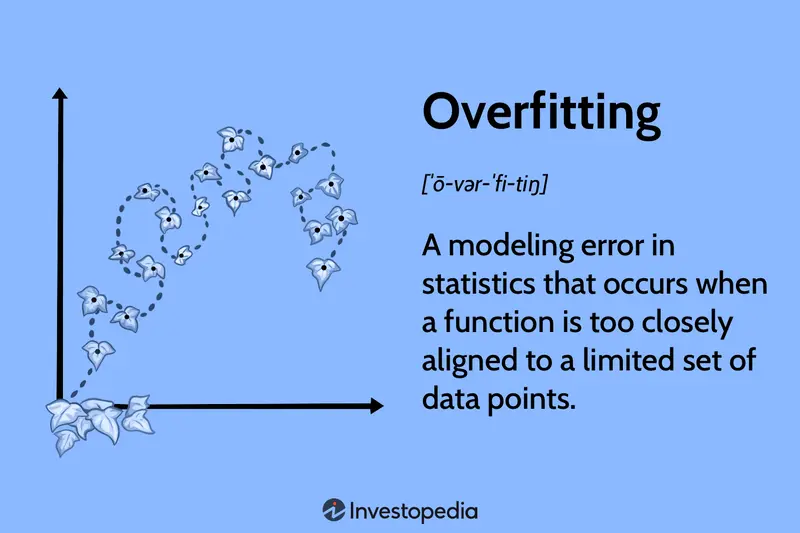
Both validation and test images are important because testing a model with the same images that it was trained on can lead to overfitting, where the model works well for its training data but poorly for new images. But since these images aren’t used for training, they are an independent snapshot of the model’s accuracy on new data.
It’s recommended you set aside roughly 10% of images for validation and 10% for testing. This depends on your total samples too. The more samples you have, the lower your overall percentage needs to be.
How do I evaluate my classification model?
There are many ways to evaluate your classification model and determine if it’s ready for deployment.
Accuracy
Evaluating your model generally involves tracking its accuracy (the percent of images it tags correctly). Ways to measure this include:
- Accuracy against training dataset - Many classification tools will report on the model’s accuracy against the training dataset. Meaning, it will run the model against the already-uploaded training images and tell you what % of predictions match the actual labels. While this provides a useful gut-check, you shouldn’t rely on this metric alone to assess accuracy.
- Accuracy on validation/test images - As touched upon above, it’s good to set aside images for testing that are never used for training.
- Accuracy in practice - You can also deploy the model and track its performance on real data.
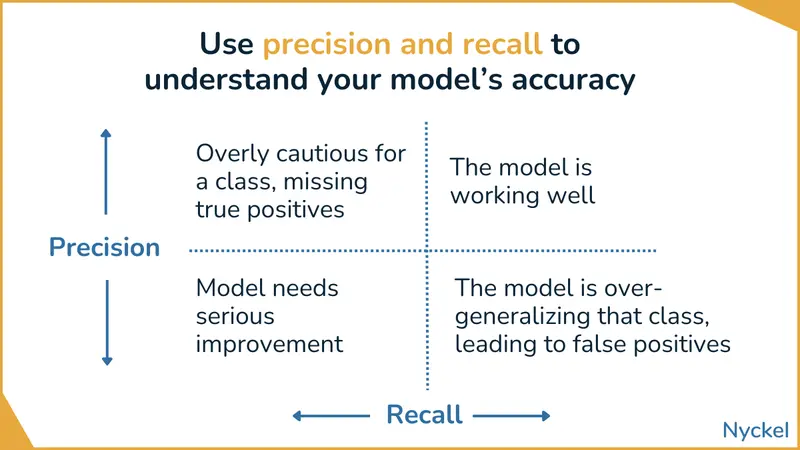
Precision and recall
Other ways to evaluate your model include precision and recall, which focus on specific classes.
| Accuracy | Recall | Precision | |
|---|---|---|---|
| What it measures | The % of times it selects the right label across all images. | The % of times it selects the right label across images in a specific class. | For a specific label, the % of times it predicted it correctly versus all times it picked it |
| Useful for understanding | The overall accuracy of the model. | The accuracy within a certain class. | How reliable the model is for a specific class. |
To visualize this, let’s create a surprisingly inaccurate Balloon vs. Zebra classifier containing 100 images.
| Actual Label | Total Images | Predicted as Balloons by Model | Predicted as Zebra by Model |
|---|---|---|---|
| Balloons | 40 | 30 (correct) | 10 (incorrect) |
| Zebra | 60 | 20 (incorrect) | 40 (correct) |
- Balloon Precision - Correctly-labeled balloons divided by total times the model picked balloons = 30 / 50 = 60%
- Zebras Precision - Correctly-labeled zebras divided by total times the model picked zebras = 40 / 50 = 80%
- Balloon Recall - Correctly-labeled balloons divided by total balloons images = 30/40 = 75%
- Zebras Recall - Correctly-labeled zebras divided by total zebra images = 40/60 = 67%
These metrics can help you troubleshoot your model. Watch for classes with:
- Low recall, low precision - The model not only fails to get a given class correct, but it frequently assigns that label to the wrong class.
- Low recall, high precision - When the model predicts that class, it is generally correct, but it’s not selecting it as often as it should.
- High recall, low precision - The model is accurate within a certain class, but at the cost of incorrectly labeling too many other images (“false positives”). In other words, the model is picking that class often, whether or not it’s correct.
- High recall, high precision - The model is not only good at identifying a given label correctly, but rarely selects that class when it shouldn’t too. This is what you’re aiming for.
To fix instances of low recall, you’ll want to prioritize adding more training samples for that class. With high recall but low precision, you should review the class’s images/labels to ensure they capture just what you want.
Confusion matrix
A confusion matrix is a table for visualizing the performance of a classification algorithm. It tracks the relationship between actual label and predicted label.
(The balloons/zebra table above is a simple binary confusion matrix.)
Below is an example confusion matrix for a multi-class classifier with three labels: Zebra, Horse, or Balloon.
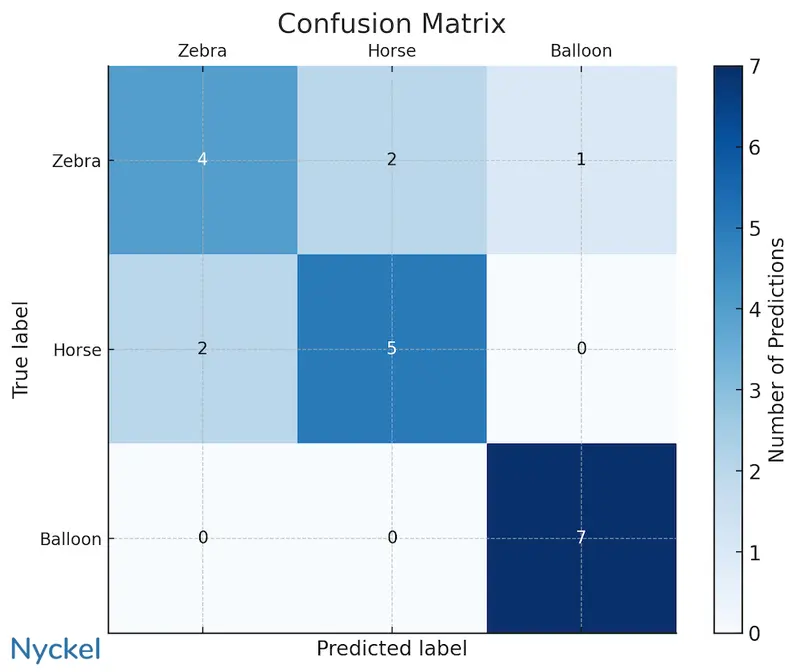
The matrix is helpful in quickly seeing that the model is good at correctly identifying a balloon (and not mistaking a horse/zebra for it), but it’s medicore at differentiating between horses and zebras. Indeed, of the 7 times the model predicted zebra, 28% of the time it was a horse.
This is data that can help troubleshoot and improve the model. In this instance, questions to ask are:
- Have I labeled the images correctly? An incorrectly labeled training image can skew the model.
- Are the training images for each animal similar? Both would ideally be similar angles and distances away.
- Do I have enough training samples? There’s only 7 samples for each, so an obvious first step is to add more training samples for these two classes.
What’s a good accuracy for an image classification model?
Your ideal accuracy will depend on your use case. If you’re identifying malignant tumors, for instance, a 90% accuracy rate may be concerning. But if your dog classifier can identify dog species across 150 classes with 90% accuracy, you should be happy.
It’s also good to understand what the human accuracy baseline is (aka, how accurate humans are in labeling the images). If humans are right 99% of the time, you should be aiming for 100%.
But in some cases, like classifying trees that look very alike, it’s possible that humans are right just 30% of the time. And if it’s hard for a human to differentiate, it’ll be hard for a computer as well. In this case, if you hit a 50% accuracy, you could consider that a major achievement.

How do I launch my own image classifier?
Your main options for creating your own image classifier include:
- Build your own
- Use an AutoML classification vendor
- Use a pretrained classification API
Build your own
You can build your own classification model using a variety of tools. Theoretically you can build it entirely from scratch by building your own algorithm and connecting directly with a Convolutional Neural Network (CNN) or similar model. But, most likely you’ll abstract some complexity by integrating with a ML framework like PyTorch or Keras and/or use a ML-Ops infrastructure tool like AWS SageMaker. These let you fully customize your model while simplifying more technical aspects.
Pros:
- Complete control - You have full control over the model, from the architecture to the training process.
- Cost-effective - Outside of opportunity cost, hosting the model yourself is generally cheaper than working with a vendor.
- Community support - These frameworks and ML-ops tools have lots of resources and documentation.
Cons:
- Time-consuming - It requires a significant time and effort commitment.
- Requires expertise - This path is a non-starter if you don’t have extensive machine learning experience already.
- No to minimal user interface (UI) for management - Makes it harder to visualize performance and improve the model.
- Hard to troubleshoot - When handling everything including data preprocessing, model design, training, and evaluation, it may be hard to troubleshoot issues.
- Scalability concerns - If you’re handling billions of monthly classifications, it could be hard to maintain uptime.
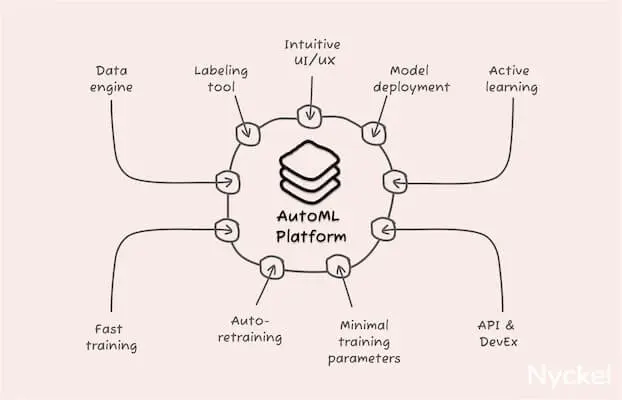
Using an AutoML classification platform
You can also launch a classifier with an AutoML machine learning tool (generally sold as software-as-a-service). They abstract the work involved — such as pre-processing and algorithm design — which greatly reduces time to deployment. They also include an out-of-the-box UI for sample management and accuracy tracking.
Pros:
- User-friendly UIs - UIs make it easy to track your progress, identify inaccuracies, and fine-tune as needed.
- Quick deployment - You can deploy a model in less than a day (with some, in just minutes).
- Less machine learning experience needed than DIY path - While the complexity will vary by tool, these solutions nonetheless aim to minimize the ML complexity.
- Maintenance - The vendors will troubleshoot and fix bugs for you.
- Scalable - It’ll be on the tool to handle scale and uptimes.
Cons:
- Cost - Can be expensive, especially for high-volume use cases.
- Less architecture customization - You won’t have as much control over the underlying algorithm or how the model is structured.
- Data privacy - Any time you send data to a third-party, there are security risks.
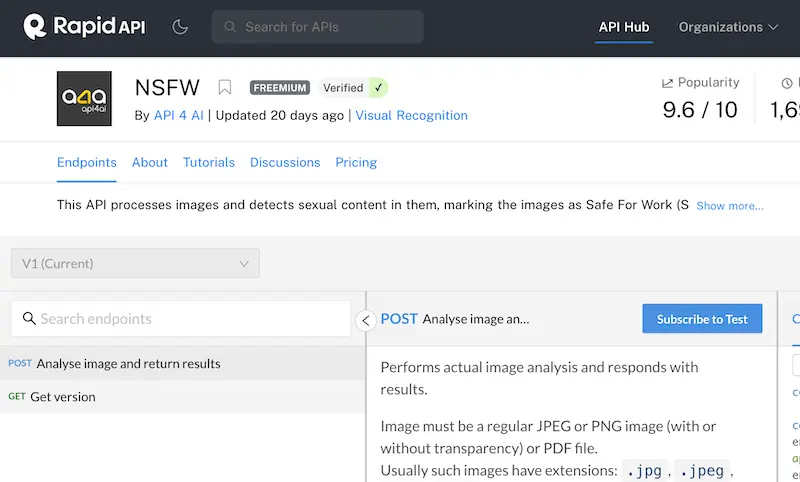
Use a pretrained classification API
Rather than building a classification model, you can also always hook into a pretrained classifier, like those offered on Zyla, Rapid, and Nyckel. These generally operate as black boxes, where you ping the API with the image, and it’ll return the label and confidence score. While not customizable or ideal for bespoke use cases, they can be good for commoditized datasets, like porn identification.
Pros:
- Fast to launch - Can take just minutes to integrate.
- No machine learning knowledge needed - If you can code to an API, you’re good.
Cons:
- No fine-tuning - If these models don’t have the accuracy you want, you can’t improve their accuracy yourself. A prettiness identifier, for example, would be built with someone else’s preferences, not necessarily what you would select.
- Limited number available - On Zyla, for instance, there are just 16 image classification APIs available.
- Not for custom use cases - These are useful for certain situations — like color tagging or content moderation — but won’t work for custom computer vision use cases.
10 best image classification solutions
Below looks at the top 10 platforms you can use to create your own classification model, covering both free open-source solutions, SaaS AutoML vendors, and API marketplaces.
Nyckel
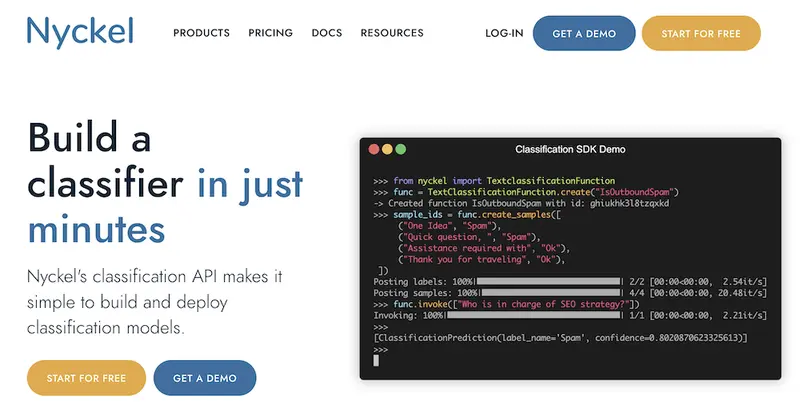
Nyckel provides a classification API that makes it easy to create and deploy image classification models in just minutes.
Pros:
- Real-time training - The model automatically updates after every change, making it easy to fine-tune and iterate.
- Elastic Pricing - You only pay for usage versus the more-confusing “always-on” node pricing that most tools use.
- API-approach makes it developer friendly - Many AutoML tools are not API-first, forcing customers to work through the UI. Nyckel has API / UI parity.
- Streaming API - Unlike other batch API tools, Nyckel’s API offers real-time creation of functions, uploading samples, and invoking.
Cons:
- Not as many bells and whistles as other solutions - Because Nyckel focuses on supervised classification, they don’t offer every feature, such as video classification.
- No customization of model’s algorithm - The decision to abstract the machine learning complexity does mean there’s no way to adjust the foundational model algorithm.
Google Vertex AI

Google Vertex AI is Google’s unified data and AI platform. While powerful, it comes with a steep learning curve, and the initial setup and labeling process can be complex. Still, its integration with the broader Google ecosystem can be advantageous for those willing to invest time in the learning curve.
Pros:
- Rich library of help docs - Google does a great job at creating explainer videos and guides if you get stuck. Additionally, there’s a broader Google community that actively shares ideas and recommendations.
- Backed by Google - Nobody got fired for buying from Google. It’s a safe route, even if not the easiest.
Cons:
- Steep learning curve - Unless you are already well-versed in Google’s developer products, their dashboard can be difficult to navigate.
- Slow to train / build - Each time you want to train, even for a small dataset, it can take hours. Larger datasets can take 24 hours or more. This makes real-time fine-tuning impossible.
Amazon Rekognition
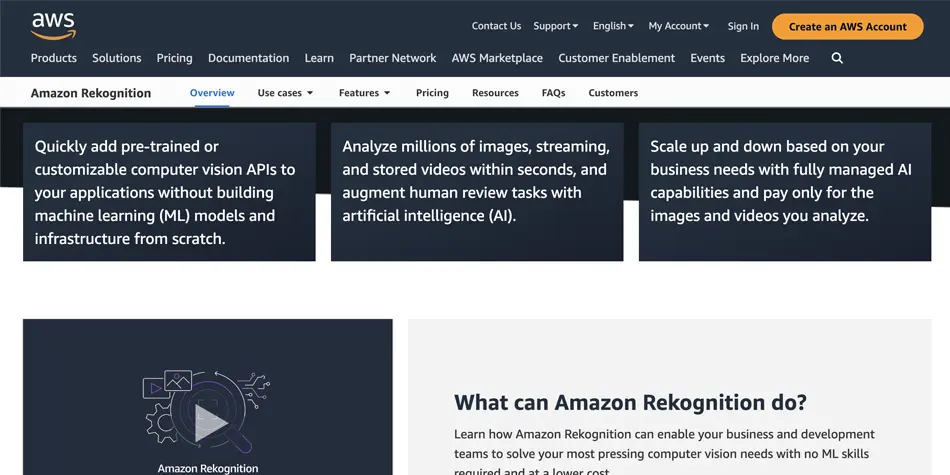
Amazon Rekognition offers customizable computer vision APIs. While the setup process can be tedious, the platform’s interface simplifies the training process. However, it requires coding for deployment, so it’s not ideal for those without coding expertise.
Pros:
- Great for machine learning experts - Amazon provides granular controls for manipulating your algorithm and models. If you know how to work them correctly, you get a lot of flexibility.
- Backed by Amazon - You can trust that Amazon will continually improve their product and offer extensive integration guides.
Cons:
- Tedious set-up - Unlike more turnkey AutoML vendors on this list, Rekognition is confusing and time-consuming to set-up. Deployment also requires extensive coding versus a simple API call.
- ML experience is not a must, but it’s recommended - The flipside of a robust feature set is that managing them can be difficult unless you understand ML well.
Hugging Face AutoTrain

Hugging Face AutoTrain allows you to quickly build image classification models through their open-source tool. It offers pretrained models and fine-tuning options, making it suitable for various applications.
Pros:
- Integrated with the Hugging Face ecosystem - Hugging Face is major playing in the ML space, with a large community that uploads free models, ideas, and datasets.
- Great for open-source lovers - Hugging Face makes it easy to publish your models to the open web, allowing you to share and solicit feedback easily.
Cons:
- Still requires some technical knowledge - You can view Hugging Face as the Github of Machine Learning. Just as Github requires some basic technical know-how (such as how to spin up a repo and edit code), Hugging Face requires some basic coding skills.
- Focused on open-source - Businesses that want a more hands-on, closed experience may not enjoy Hugging Face’s open-source philosophy.
Ximilar

Ximilar specializes in computer vision, providing user-friendly tools and pretrained models. Its drag-and-drop interface streamlines data import and labeling, while model training takes around 20 minutes.
Pros:
- Good accuracy - In our image classification benchmark, Ximilar was one of three tools that had a 100% accuracy (alongside Nyckel and Azure).
- Lots of pretrained classifiers - These tools focus on product tagging and trading card classification.
Cons:
- No large user community - Unlike other vendors on this list, there’s no robust user community for soliciting ideas and support.
- Pricey - Their second tier (Professional) can cost as much as $3,435 per month.
Roboflow

Roboflow focuses on computer vision, offering a drag-and-drop interface for image and video upload. Their model training is efficient, taking just six minutes in our testing, although it can take a while for a new user to get to the training step.
Pros:
- Built for machine learning enthusiasts - Roboflow offers many product types and fine-tuning tools, making it extensible, though complicated. This makes them a good tool for ML experts, but less appealing to non-devs.
- Great user community - Roboflow has tens of thousands of user-generated datasets and public models (access to these are free for anyone who signs up).
Cons:
- Steep learning curve - The Roboflow UI, while sleek, is complicated, with many options to choose from in each step. It can take a while to get used to.
- Not focused on image classification - While they offer image classification, it’s often downplayed in favor of “more interesting” use cases like real-time object tracking in videos.
Azure Custom Vision
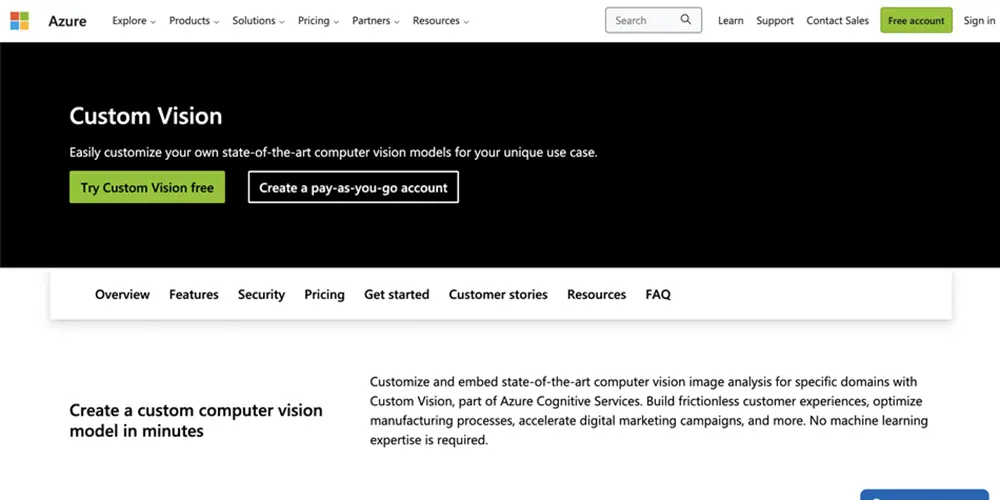
Microsoft’s Azure Custom Vision touts itself as enabling users to create “state-of-the-art” computer vision models easily. They list Volpara Solutions, Honeywell, and Pepsi as customers.
Pros:
- Backed by Microsoft - Like the other behemoths on this list, Azure has a strong prebuilt community and reliable infrastructure.
- Accurate - In our research, Azure was just one of three solutions (alongside Nyckel and Ximilar) with perfect accuracy ratings.
Cons:
- Steep learning curve - Like Amazon and Google, Azure is not an intuitive tool, and a knowledge of ML and the Azure ecosystem is pivotal to getting launched quickly.
- Confusing pricing - Their pricing is convoluted and depends on your region, the number of API calls, training per compute hour, and image storing needs.
Clarifai
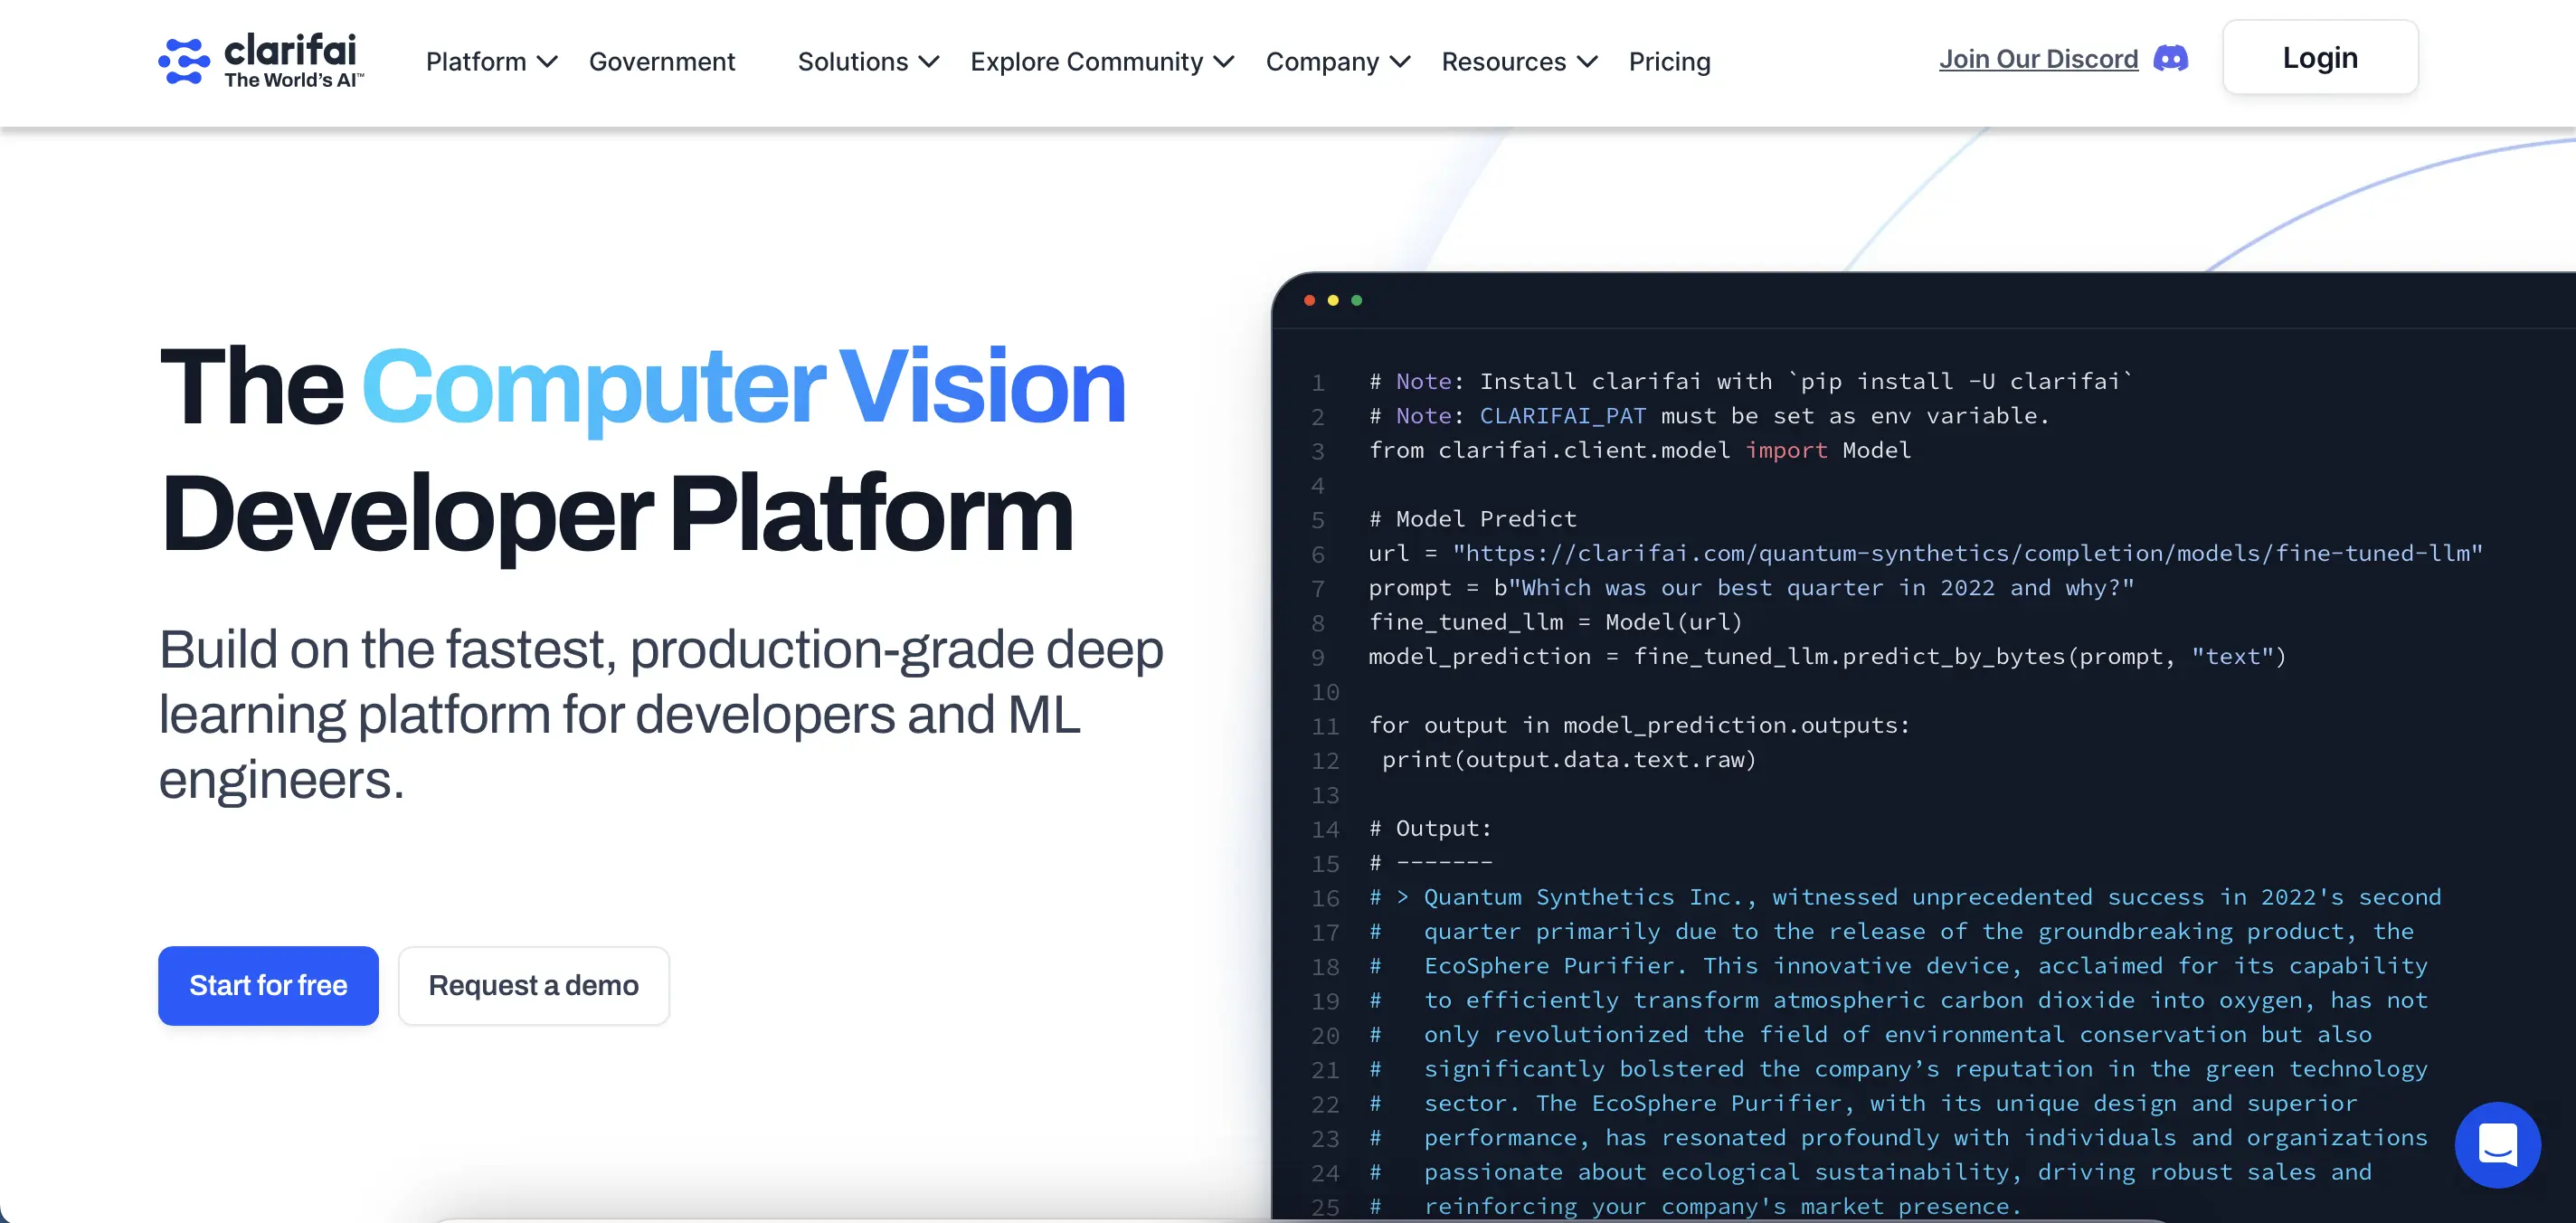
Clarifai calls itself many things: a generative AI platform, LLM platform, computer vision platform, and full stack AI platform. Its customers include Acquia DAM, Foap, and OpenTable.
Pros:
- Large offering - Clarifai offers a full suite of AI tools, from discriminative to generative.
- Clean UI - Their UI is streamlined and intuitive.
Cons:
- Confusing terminology - In many instances, Clarifai has coined terms rather than use industry standard ones. For example, Clarifai calls image labels “concepts,” and it can take a while to sort through their Clarifai-specific classifier names to figure out what you actually need.
- Low accuracy - In our image classification benchmark, Clarifai had just a 70% accuracy, and the images it got right had low confidence scores.
Keras / Tensorflow / PyTorch

These three tools are all open-source machine learning frameworks. They make building your own machine learning model simple, but they don’t abstract it completely, so you still need a deep understanding of ML to launch.
Pros:
- Full control - You can adjust nearly all parts of the model. Compared to the AutoML vendors on this list, you have much more control over the nuances of the algorithm.
- Cost-effective - Outside of opportunity cost, hosting your own model tends to be cheaper than a third-party vendor.
Cons:
- Requires machine learning experience - If you don’t have a ML background, it’ll be hard to get going.
- Time-consuming - Even if you have ML experience, there’s a major time and effort commitment.
Rapid / Zyla
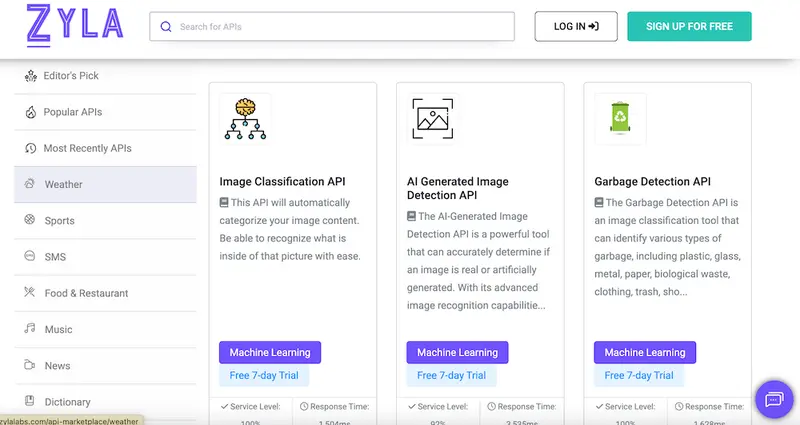
These are two pretrained API marketplaces, and they provide access to some image classification models. These operate as black boxes, where you ping the API with the image, and it’ll return the predicted label.
Pros:
- Fast to launch - Can take just minutes to integrate.
- No ML experience needed - You must be able to code to an API, but that’s it.
Cons:
- No fine-tuning - If these APIs are inaccurate, you can’t improve their accuracy yourself.
- Limited number - On Zyla, for instance, there are just 16 image classification APIs available.
- Not for custom use cases - These are useful for commoditized situations — like color tagging or content moderation — but won’t work for proprietary projects.
Image classification next steps
Image classification can be daunting, but third-party tools can reduce the complexity of launching your own model.
If you’d like to dip your toes into image classification, we recommend Nyckel. Launching your own classifier takes just minutes, and you can build them through the UI or the API.