Nyckel vs. Keras Image Classification Comparison


For this article, we hired Becca Miller, a freelance software developer and technical writer, to walk through the Keras and Nyckel image classification processes. Becca details her experience with both ML services and shares how you can build the image classifier yourself with either option.
Image classification is a popular machine learning method that trains computers to recognize and categorize images into labels. In this article, I’ll demonstrate how you can build an image classification model with Keras.
Then, I’ll compare how you can solve an image classification task with Nyckel, a specialized AutoML platform that simplifies the ML development process.
To compare Keras vs. Nyckel, I’ll work with a publicly available dataset that contains various cat and dog images. My goal is to train an image classifier using both ML services by leveraging the technique of transfer learning. With transfer learning, you can use pretrained models that have been extensively trained on large datasets, enabling you to fine-tune and adapt these models for a specific classification task without needing a significant amount of data.
Throughout this comparison, I will:
- show how you can use either machine learning solution for image classification,
- share an in-depth analysis of the strengths and weaknesses of each approach, and
- give you a comprehensive understanding of both ML services, so you can make an informed decision based on your precise requirements and constraints.
Image classification dataset
To get started, I break the dataset into smaller subsections before training the image classification model. The cat and dog dataset is large, including 8,007 training images and 2,025 testing images. However, given that the main benefit of transfer learning is that you can train a model without a significant amount of data, I don’t need to use the entire dataset. Instead, I’ll use 100 cat photos and 100 dog photos for training and 20 photos of each for validation. This subset provides a manageable dataset that’s a good starting point for illustrating the image classification process with Keras and Nyckel.
How to create a Keras image classifier
Now, I’ll walk through the essential steps involved in training an image classification function with Keras. You can also access a Jupyter notebook that demonstrates this process.
1. Prepare your data
Before training the model with Keras, I first need to ensure that I prepare the data. Preparing the data involves loading and preprocessing the images to create a suitable input format for the neural network. Using Keras’ data preprocessing tools, I can organize and format the data for model training.
2. Import a model for pretrained embeddings
The Keras library includes various pretrained models, and for this image classifier, I will use the VGG16 pretrained model. This model is compatible with Keras and offers excellent performance in image recognition tasks. While Keras is also compatible with other state-of-the-art-models, such as CLIP, these models often require you to interact with lower-level frameworks like TensorFlow, rather than Keras alone.
3. Train your image classifier
Unlike other deep learning frameworks, such as TensorFlow or PyTorch, Keras provides a high-level interface that simplifies neural network development. Developers can leverage Keras’ high-level API without dealing with the complexities of these lower-level frameworks. This makes Keras a relatively user-friendly library for machine learning and makes it especially useful for quick prototyping.
However, even with Keras’ diverse library of functions and pretrained models, fine-tuning a model can be challenging. I have to manually configure the fine-tuning process with appropriate hyperparameters to achieve the desired results, which requires persistent experimentation and refinement. Additionally, to unlock the full customization options provided by lower-level deep learning frameworks, I had to dig into Keras’ underlying TensorFlow architecture.
4. Evaluate Keras’ image classification model
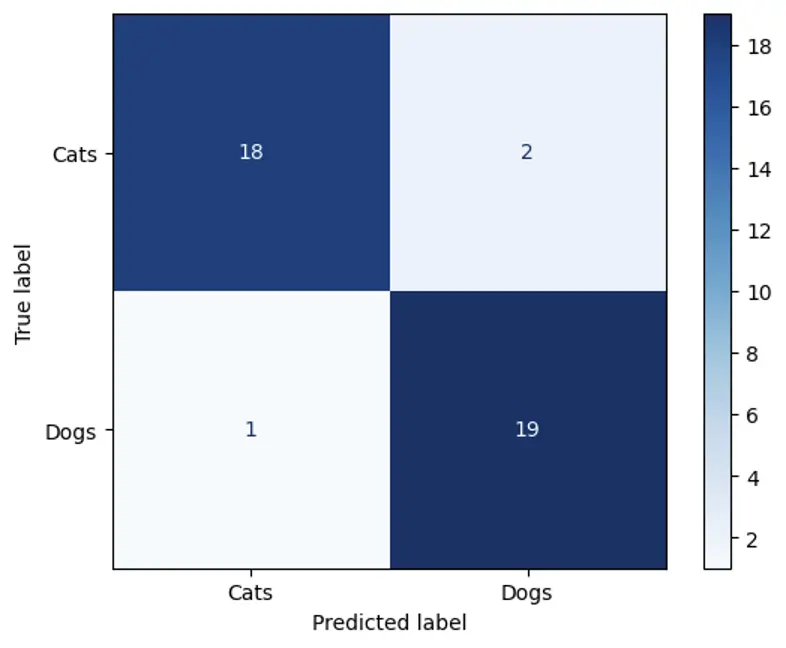
After I train the Keras image classifier, I can evaluate the model’s performance. This step is critical for determining the model’s ability to correctly identify and categorize images. When testing the model, I see that it achieves an accuracy of 92.5% on the validation set.
I also evaluated the model’s performance via a confusion matrix, which offers insights into the classifier’s ability to correctly classify and differentiate between different classes:
5. Package the image classification model as a Docker container
Once I’m happy with the model’s performance, I package it as a Docker container so that it can be deployed to the target environment.
Image classification with Nyckel Python SDK
Now, I’ll try out the image classification process with Nyckel. I’ll demonstrate how to train an image classification function with labeled samples and how to invoke the trained model.
With Nyckel, you can choose to use the Nyckel Python SDK or do everything from Nyckel’s interface. For this example, I’m going to use the Python SDK.
Since Nyckel automates much of the process, creating an image classification function really only involves two steps. Later in the article, I detail just what Nyckel does in the background to make the process so simple for the end user.
1. Use Python code to train your model
Here is all the code you need to train your model:
import os

from nyckel import User, ImageClassificationFunction

user = User(client_id="", client_secret="")

# Set the paths for the training and testing datasets

train_data_dir = 'cats-or-dogs/train'

test_data_dir = 'cats-or-dogs/test'

cats_dir = '/cats'

dogs_dir = '/dogs'

train_cat_dir = train_data_dir + cats_dir

train_dog_dir = train_data_dir + dogs_dir

test_cat_dir = test_data_dir + cats_dir

test_dog_dir = test_data_dir + dogs_dir

train_cat_files = os.listdir(train_cat_dir)

train_dog_files = os.listdir(train_dog_dir)

test_cat_files = os.listdir(test_cat_dir)

test_dog_files = os.listdir(test_dog_dir)

training_data = \[]

# Get all the filenames in the folder

for file in train_cat_files:

filename = train_cat_dir + '/' + file

training_data.append((filename, 'cats'))

for file in train_dog_files:

filename = train_dog_dir + '/' + file

training_data.append((filename, 'dogs'))

func = ImageClassificationFunction.new("IsCatOrDog", user)

func.create_samples(training_data)
2. Evaluate Nyckel’s image classification model
One of the biggest benefits of Nyckel is that it automatically chooses the best model, cross-validates your data, and handles deployment (more on that in the next section). Since it does that heavy lifting, I’m already ready to evaluate the image classification model. Nyckel uses metrics such as precision, recall, and F1 to automatically assess the performance of a trained model.
Looking at the model’s performance, I see that it achieved an accuracy of 100% on the training data, correctly identifying all images as cats or dogs. I can also use the test set to quickly evaluate the model’s performance.
I can see how the model performs on individual labels with the following code:
for file in test_cat_files:

filename = test_cat_dir + '/' + file

prediction = func(filename)

print('predicted label: {}, true label: cats'.format(prediction.label_name))

for file in test_dog_files:

filename = test_dog_dir + '/' + file

prediction = func(filename)

print('predicted label: {}, true label: dogs'.format(prediction.label_name))
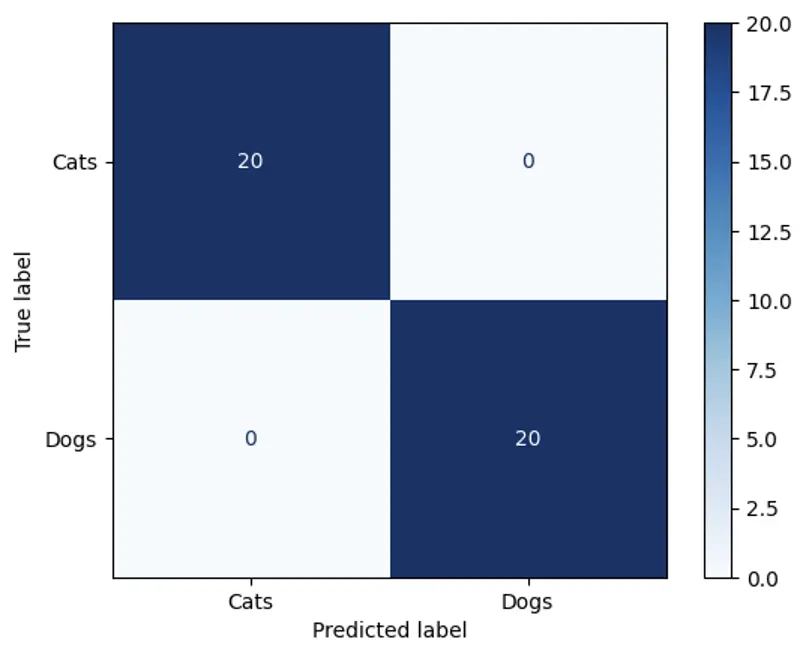
By looking at this code’s output, I can see that the model correctly classified all data in the testing set, too. All 20 dogs are correctly classified as dogs, and all 20 cats are correctly classified as cats. Again, I can visualize this performance with a confusion matrix:
Understanding how Nyckel works
Nyckel automates much of the machine learning development process, making the tool accessible to both machine learning novices and experts. Here are a few of the features the platform includes:
Exploration of various model types
Nyckel automatically explores multiple base models, fine-tuning methods, and hyperparameters to find the best model for your dataset. By automating this process, Nyckel encodes best practices for training while eliminating the tedium of evaluating various models and training methods manually.
Training via cross-validation
Nyckel uses cross-validation to train its models, a method that involves resampling the data so that different data segments are used for model testing and training on each iteration. This process is a data efficient way to train a model, allowing you to generate models with less training data. Additionally, the model’s performance on cross-validated data suggests how it will likely perform on independent test sets.
Simple deployment
When Nyckel trains your model, it is instantly deployed to hardware that scales up or down depending on your usage. It can be integrated into your application through an API call.
Image classification using Nyckel’s UI
In addition to the Python SDK I used above, Nyckel provides a user-friendly web interface that simplifies the image classification process for users who’d prefer not to use Python code. Additionally, Nyckel’s UI can be used independently or in conjunction with the Python SDK.
See how I built the cat vs. dog image classification function with Nyckel’s web interface:
Here are a few of the features available via Nyckel’s UI:
- A data engine that allows users to inspect and iterate on data used to train the model. For example, you can identify the kinds of data where the model performs poorly and add new data inputs to correct these shortcomings, ultimately improving model performance.
- An invoke capture feature that automatically and intelligently captures “informative” data as you invoke your model. Nyckel places these informative data samples in a queue for your team to review and annotate later. Then, as you annotate this data in Nyckel’s dashboard, Nyckel automatically retrains your model and redeploys the improved version of it.
Keras vs. Nyckel: Which is right for you?
Choosing between Keras and Nyckel for image classification first requires you to understand your specific requirements and assess the ML expertise level you have available on your team.
Keras is a good fit for ML developers seeking a balance between ease of use and customization. The framework provides a high-level API that is accessible to intermediate ML users, as well as beginners looking to learn more about ML techniques. Advanced users can also dig into Keras’ low-level architecture for more fine-grained control. Nyckel, on the other hand, provides a solution for users looking to simplify the image classification process without sacrificing accuracy.
Keras
- High-level API: Provides ML developers with a high-level, intuitive, and modular building-block approach to creating neural networks that is suitable for fast prototyping.
- Fine-grained control: As the official high-level API for TensorFlow, Keras allows users to pursue fine-grained control over models and hyperparameters. It is also compatible with other backends like Theano and CNTK.
- Hardware flexibility: Enables the deployment of trained models on a wide range of hardware, ensuring adaptability to various infrastructure setups.
Nyckel
- Model optimization: Conducts an extensive model and hyperparameter sweep, increasing the likelihood of finding an optimized model with embedded best practices for superior performance.
- Reliable results: Integrates cross-validation techniques to enhance model reliability and accuracy, ensuring robust performance even in complex, real-world scenarios.
- Efficient deployment: Automatically deploys models to elastic and cost-optimized hardware, facilitating seamless scalability and efficient resource utilization.
- Automated retraining: Automatically retrains the model as new data is added, eliminating the need for manual retraining and saving valuable time and resources.
- Data engine: Utilizes a robust data engine for streamlined data management, allowing for dynamic data analysis and refinement in tandem with the trained model.
- Invoke capture: Provides the capability to invoke capture, enabling the capture of real-time insights for continuous refinement and enhancement of the image classification model.
While Keras offers a high level of customization and flexibility for machine learning practitioners, Nyckel offers a user-friendly platform that simplifies the image classification workflow without compromising performance and reliability. Nyckel’s intuitive interface and comprehensive features facilitate the image classification process, helping users achieve excellent results with improved efficiency. Its automated features and integration with advanced data management tools make it an ideal choice for users looking for an easy-to-use yet high-performing image classification solution.
Would you like to explore how Nyckel could solve your image classification task? Sign up for a free account or reach out to us at any time for support along the way.